Start a project with Me today!
Contact MeHow to host your custom(Country level/Top level) domain in Azure?
Managing and Configuring custom domains in the Azure.
In Azure, we can host 10 ASP.Net websites for free. But to configure a custom domain we need the website to be scaled to either SHARED, BASIC or STANDARD mode.
First of all, purchase a domain from Go Daddy or Big Rock. Or Also from any other domain Name provider. Now, open Azure Portal and login with your Microsoft account, and create a Web App(website) there.
Part 1: To Creating a Website in Azure:
Follow the Series of steps in Part 1 of the Link below to create the website in Azure.
Deploying a Website in Azure via FTP (File Transfer Protocol).
Part 2: Configure your Azure Web App as:
Step 1: Login to portal with your Microsoft Account.
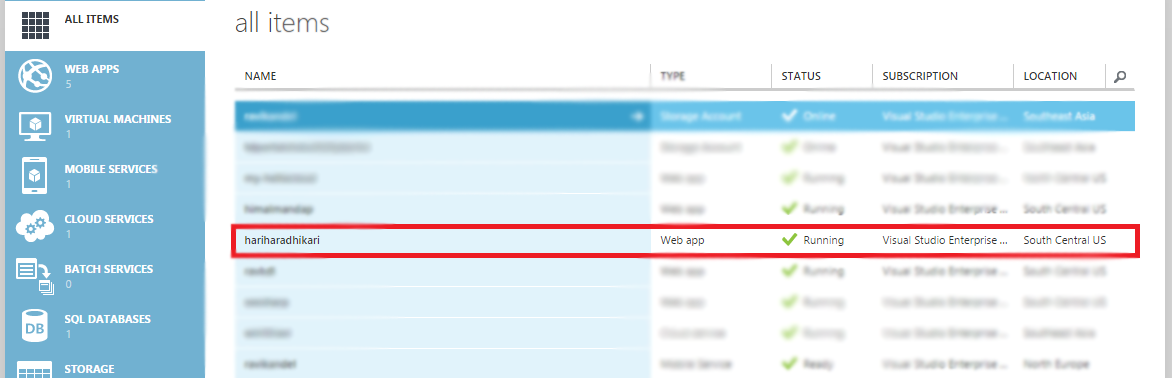
Step 2: Select the Web App that you have created. In my case, I am using “hariharadhikari” as example, and is shown below:
Step 3: Then, Go to the Scale Menu there.
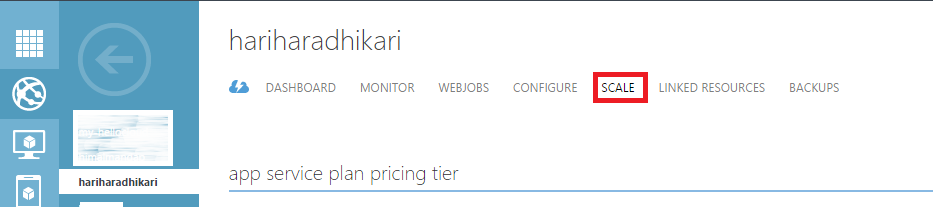
Step 4: Now, change “app service plan pricing tier” to either SHARED, BASIC or STANDARD mode and “Save”. This requires an active subscription. In my case, I am changing it to “BASIC” mode as shown below:

Step 5: Then, Select the Web App that you have Created and click on “Manage Domains” at the bottom of the page as shown below:

Step 6: Then, Copy the “IP Address” available at the end of the Popup Page Appeared, and keep it safe because it is needed to point your Custom Domain to Azure Web App.
Step 7: Leave it as it is and go to your domain dashboard and Update/change the “Name Server” of your domain to:
- Primary Name Server: NS1.AFRAID.ORG
- Secondary Name Server: NS2.AFRAID.ORG
- Tertiary Name Server: NS3.AFRAID.ORG
Note: It may take certain time to point to the Server.
Part 3: To Link your custom domain to Azure App:
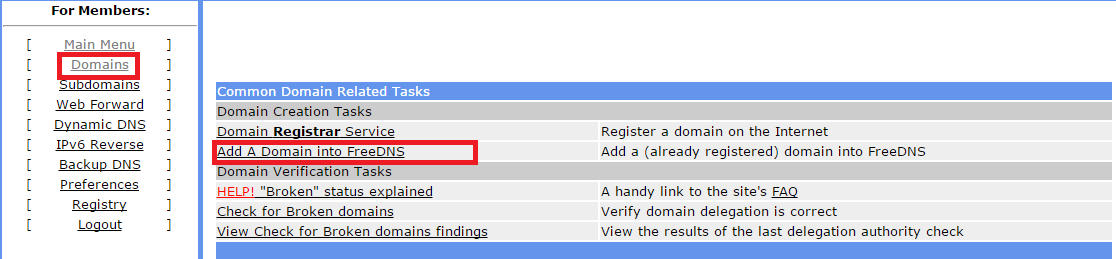
Step 8: Sign up at afraid. Go to Domain Menu there and click on “Add a Domain into Free DNS” there as shown below:
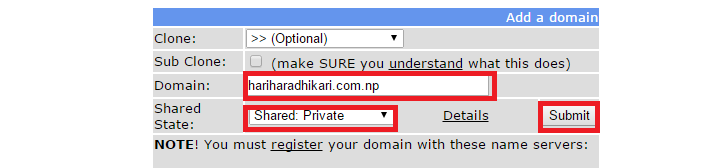
Step 9: Enter your “Domain Name” in Domain Input field and select “Private” from shared state and submit as shown below:
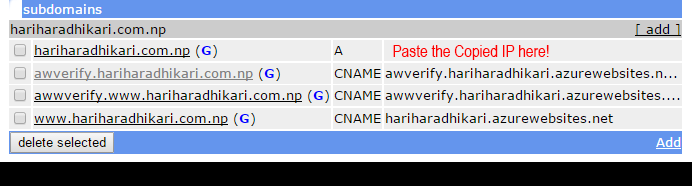
Step 10: Again, go to the domain and configure your domain similar to the domain that I have configured and remember that you must have to point the copied “IP Address” there as shown below:
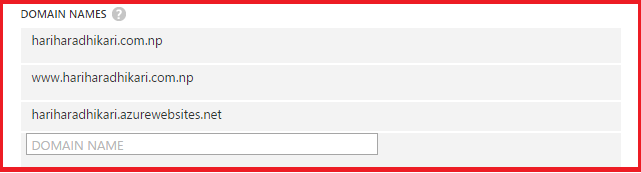
Step 11: Go to Manage Domain of the Particular Web App in Azure and Configure your domain there as similar to that I have shown below:
Step 12: Then, go to the browser and enter your domain name there you will be redirected to the Web page. Now, you are done Successfully. In my case, the domain name is “hariharadhikari.com.np”. You can check it from your browser.
Note: If any problem occurred then feel free to comment your problem, I will help you.
Tags: Happy Using AZURE!!! Happy Coding!!!
Posted : 12 years ago